Showing posts with label crochet. Show all posts

Friday, June 26, 2015

Gifts for an Angel Baby

A year after my angel baby, granddaughter, Ember Ruby, was born, we celebrated her birthday with a family gathering, over the Winter Solstice weekend.
My DIL's family rented a seaside cottage and we gathered there.
The  living area was decorated with hearts and beautiful balloons, made by POP Balloons.


On the second night the family made a bonfire on the beach and launched heart lanterns that soared out to sea.


 Later there were fireworks. 


It was a very special time that warmed our hearts and created precious memories to help carry us foward in a positive way.

My personal project for the occasion, has been to make some gifts for other angel babies.
 I know how much we were comforted by the beautiful items provided at the hospital. Some lovely things  to dress and cherish our angel, and more, to make a  Memory Box to treasure.
I was deeply touched by the kindness of the people who provide these items.
Now I want to pay it foward.

I am making two sets, one pink and one blue.
I've learnt that soft colours are best for items that will dress the babies.


My items are sized for a baby of 18-20 weeks gestation.
First I made cocoons - these are practical for wrapping and holding such a tiny baby. 
Basic pattern, by Myshelle Cole, is here  

I made my own variations for trims and hoods.  I made the closures adjustable for size
There are more details on my Ravelry project pages


I made matching blankets for keepsakes.


Pattern by Maria Bittner, for the blue blanket, is here 

Each set will have two tiny teddies-one for the baby and one for a keepsake.


The Tiny Teddy pattern is by Lucy Ravenscar and can be found here

I hope my gifts bring comfort to a family with a new angel baby.


If you would like to make items for angel babies there are many organisations that will foward on your donations.
They are often local, so try an internet search for 'angel baby' to see what organisations there are in your country.

Photographs of balloons, lanterns, and fireworks by Hayley Munro Photography.

Monday, November 24, 2014

The Ember Ruby Wine Glass Lanyard

             The Ember Ruby Wine Glass Lanyard


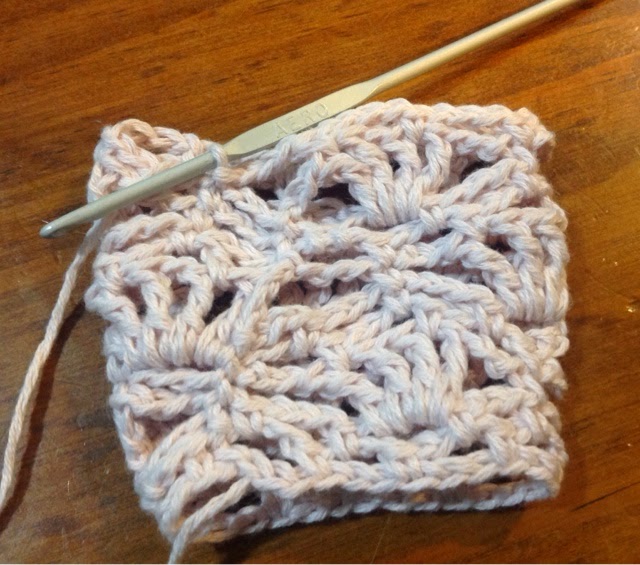
A friend shared a picture of a wine glass lanyard that she would like to have. I couldn't find a similar pattern so I made my own.


I've named my design 'The Ember Ruby Wine Glass Lanyard' in memory of my granddaughter, who was born prematurely at 20 weeks gestation, and lived for 3 hours.
Ember Ruby is a treasured member of our family.
Her mummy and daddy have been inspired by her short life. Their mission is to develop a design business, Ember Design, to carry on their daughter's name and to help others visualise their ideas.
They are taking part in a crowd funding project Spark My Potential
to raise the funds that they need.


I have written up the pattern for The Ember Ruby Wine Glass Lanyard .
There is no charge for this  pattern, but if you would like to pledge a few dollars to Ember Design's Project, that would be great.

Here are the instructions for

 'The Ember Ruby Wine Glass Lanyard'

Materials

3mm crochet hook
Cotton Yarn - I used Moda Vera Jalap-100% cotton-sport weight yarn

I have used American stitch names.
ch=chain
sl st =slip stitch
sc=single crochet
hdc=half double crochet
dc=double crochet
tr=treble


Instructions

Ch 28, join with a slip stitch in first ch, taking care not to twist the chain.

Working in rounds. Do not turn work.


Round 1
Ch 1, sc in next ch, 3 ch, miss 2 ch.
(sc, 3 ch, miss 2 ch) around.
Join with sl st in 1st sc.
You should have 9 loops/spaces.


Round 2
Ch 3. (1 sc in 3 ch space, ch 3) around. Sc in last 3 ch space. Join with sl st  in sl st of previous round.
You should have 9 loops/spaces.


Round 3
 *ch 3, miss next space, in following space work (1 tr, 1 ch) 3x, 1 tr, ch 3, miss next sc and  3 ch space, sc into next sc * around. Join with sl st, in sl st of previous round.
You should have 3 treble clusters.


Round 4
*3 ch, 1 sc between first and second tr. 4 ch, 1 sc between third and fourth tr, 3 ch, 1 sc in next sc* repeat around, but last time join with sl st in joining st from previous round, instead of last sc.
You should have 9 spaces.


Round 5
3 ch, 1 sc in first sc, 3 ch *1 sc in each space, 3 ch* around. Finish with sc in last sp, 3 ch, sl st to joining st from last round.


Round 6
4 ch. In first space work (1 tr, 1 ch) 3x. 
1 tr, 3 ch, miss next space.
*1 sc in next sc, ch 3, miss next 3 ch space, in following space work (1 tr, 1 ch) 3x, 1 tr, ch 3, miss next sc and space.* twice.
1 sc in next sc, 3 ch, join with sl st to top of 4 ch at beginning of round.
You should have 3 treble clusters in this round.


Round 7
Ch 3, sc  between first and second treble, ch 4, sc between third and fourth treble, Ch 3, skip space 1 sc in next sc * Ch 3, 1 sc between first and second treble, ch 4, 1 sc between third and fourth treble,  Ch 3, skip space, 1 sc in next sc* around. Ch 3, join with sl st to joining st from previous round.


Round 8
Ch 3, 1 sc in next space, ch 3. *1 sc in each space, 3ch* around. Sc in last sp, sl st to sl st from previous round.
9 spaces made.

Round 9
Ch 3, sc in first sc. Then repeat round 3. Last stitch is a sl st in joining sl st from previous round instead of  sc. 
You should have 3 clusters.


Round 10
Ch 3, sc in first sc. Repeat Round 4 to last sc between third and fourth treble, ch 3
Join in first sc.


Round 11 (Scalloped Edging)
Ch 1, *In each space, work (1 hdc, 1 dc, 1 hdc), sl st in sc,* around.
End with sl st in base of beginning ch 1.


Don't fasten off.
Strap
Make 150 ch. 


Join with sl st into opposite side of edging, between 5th and sixth scallop from start, working into stitch beneath sl st between scallops. 
(Take care not to twist the length of chain before you join it.)


Ch 1 and sl st into same st to the left of the first sl st.


Working on right side of stitches, sc into each chain until back to start.


Sl st in stitch below base of first ch. 


Fasten off.
Weave all ends in securely.

This design and pattern are my intellectual property, and as such are under copyright.
 Please do not sell or copy this pattern for commercial use.
You are welcome to sell items that you make from my pattern.
If you sell or blog about your projects online I would appreciate a link to this page.

If you find any errors, please let me know so that I can correct them.
Enjoy!

Tuesday, October 2, 2012

Wabbit

Wabbit by Hesterb
Wabbit, a photo by Hesterb on Flickr.
I crocheted this little rabbit for my baby grandaughter (nicknamed Blossom). I made this little crochet rabbit from cotton yarn. She has some bells inside and a detachable lavender scented flower.
I used this free pattern http://www.ravelry.com/patterns/library/rabbit- by Kristelle Trafarski
I was going to make Blossom a calico rabbit with lavender inside it for her bassinet, but I couldn’t find my pattern so I decided to make her this crochet rabbit instead.
I like this pattern. It was easy to make and I enjoyed adding my own embellishments.
I added hind feet and a pompom tail.


The feet are made the same way as the arms but with 7 stitches and are a bit longer. I sewed them firmly to the base of the body and now the rabbit can stand on its own.
I made a crochet rose that attaches with velcro. This has a few drops of lavender oil underneath it, as a sleep aid.

I really like how the rabbit has turned out.
I hope Blossom likes it too.

Postscript: As soon as Blossom began grasping I sewed the rose onto Wabbit securely, so that it was not a choking hazard.